Tuesday, February 24, 2009

The update!

So far, alot has happened...

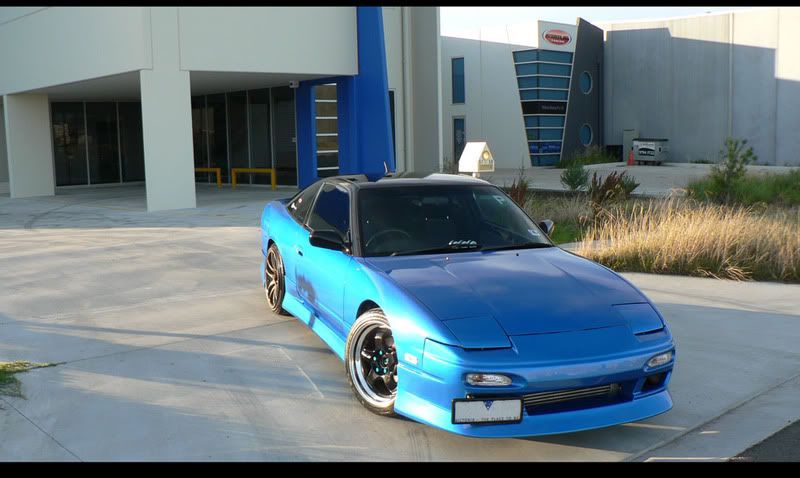
Since the last post I was looking at upgrading the suspension setup and selling the Work meisters, well since then.. Wheels have been sold and suspension setup is yet to be upgraded. Instead I decided to take a break and escape from melbourne for a couple of weeks... by taking a holiday in adelaide; it was great!

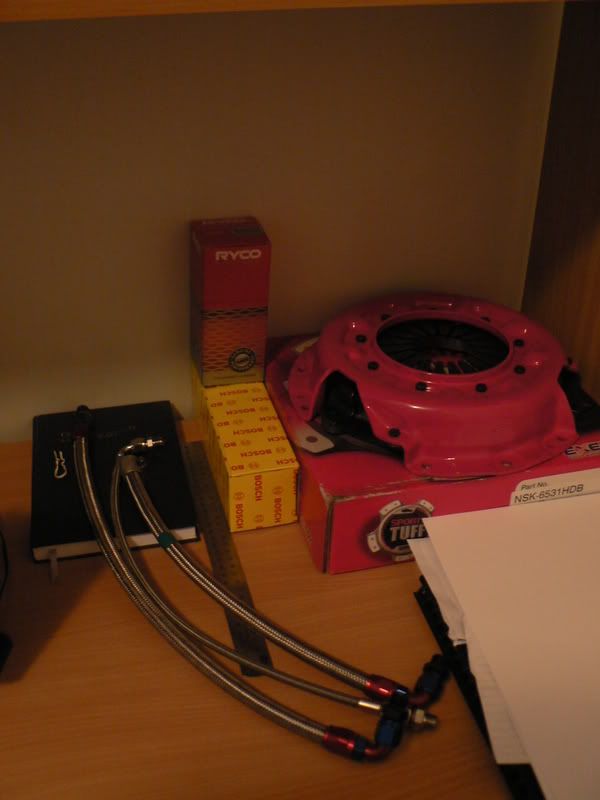
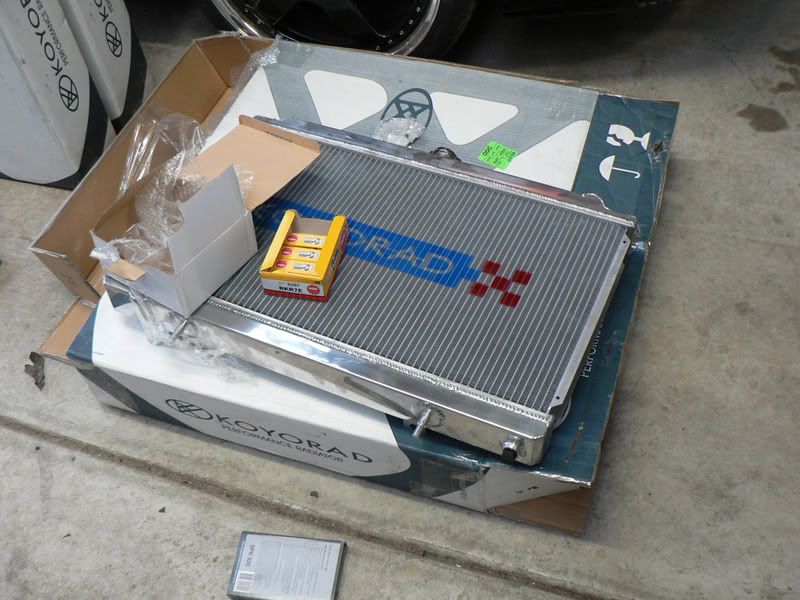
Though being encouraged by the drift scene in adelaide... the break was soon over and I found myself trapped in a splurge on the car, once again. In preperation for the next trip to adelaide (2 weeks after I had arrived back in melbourne), I focused on changing a few bits & pieces in the engine, particularly as a maintenance re-assurance.. During this splurge, the following was purchased:

- Splitfire Coilpacks
- Z32 AFM w/ Tomei plug
- Gizzmo EBC
- Oil Catch-Can w/ Braided Lines
- Blitz Sus Power pod filter
& the usual service gear..

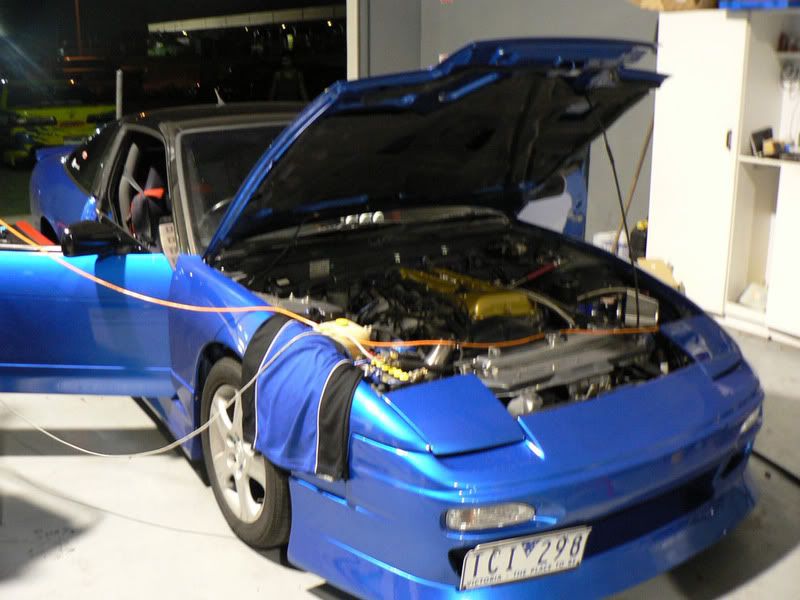
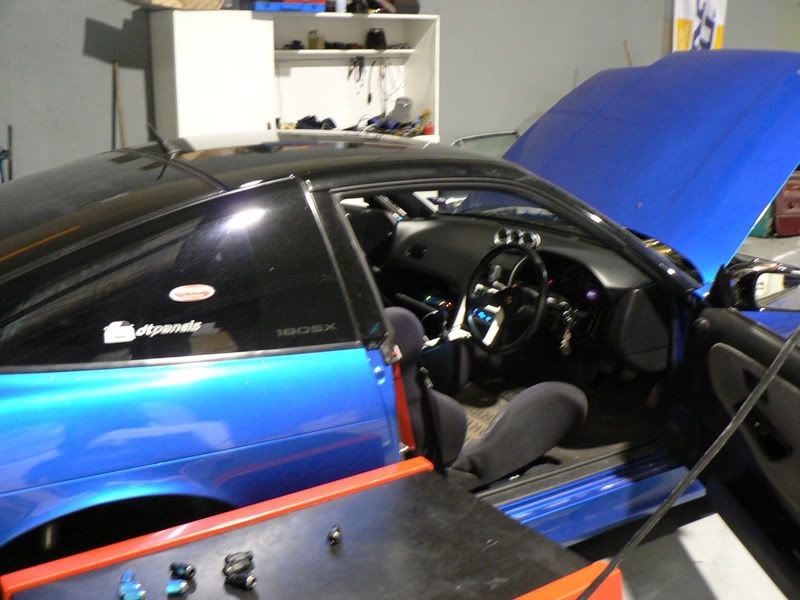
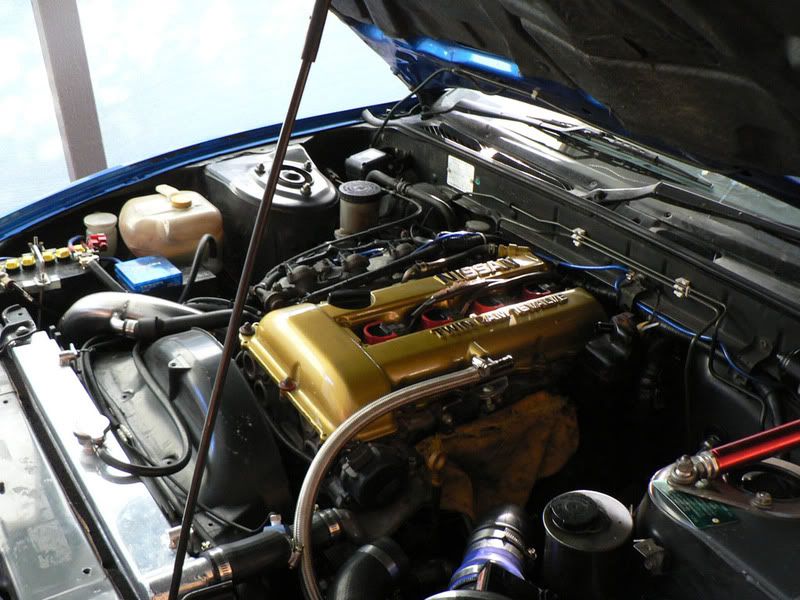
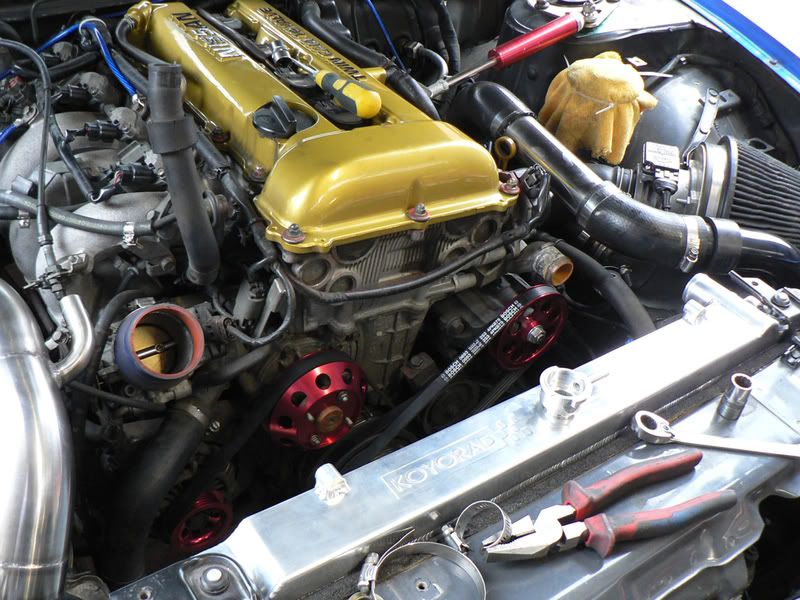
After a weekends work, all was installed and the car was in excellent condition ready for Trent to work his magic for the tune..
and he did!!!

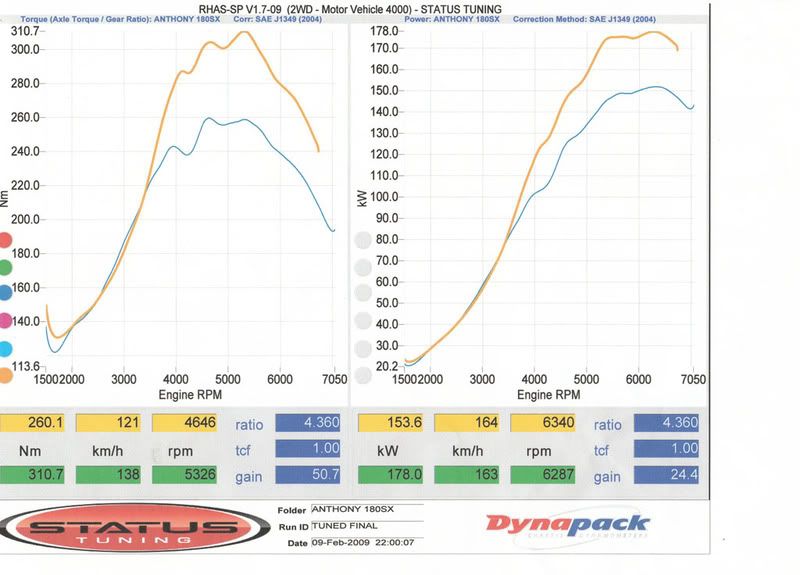
I was absolutely stoked with the result, 178rwkw was definately something I had to get use to after being use to driving around on 153rwkw at a max...


So once again, more spending went into the preperation for adelaide... Afterall, I did have the slight intention of entering at mallala, which lead me to get:

- Sabelt 4 point Harness
- Uras brake pads

Brake pads were not installed for the trip up but will be installed in the next month with new slotted rotors as a winning combination!
Well, yes.... Suppose this leaves us to the current status, which isn't looking so pretty. 10 minutes before I was about to head back to melbourne from adelaide, I came across what appeared to be an exhaust leak; an hour passing after going over the car thoroughly before heading off and Assuming the leak was the Manifold to Turbo gasket, I drove home thinking it was a simple gasket change required.

BUT! after arriving home safely... I got to work and pulled apart the manfiold and turbo from the block, to notice the turbo has completely dismantled itself from the housings. The turbo was missing 1 front bracket, 3 bolts that hold the bracket and two rear bolts that hold together the rear bracket of the housings, thus leaving the turbo held together by HALF a thread of ONE bolt and one bracket...


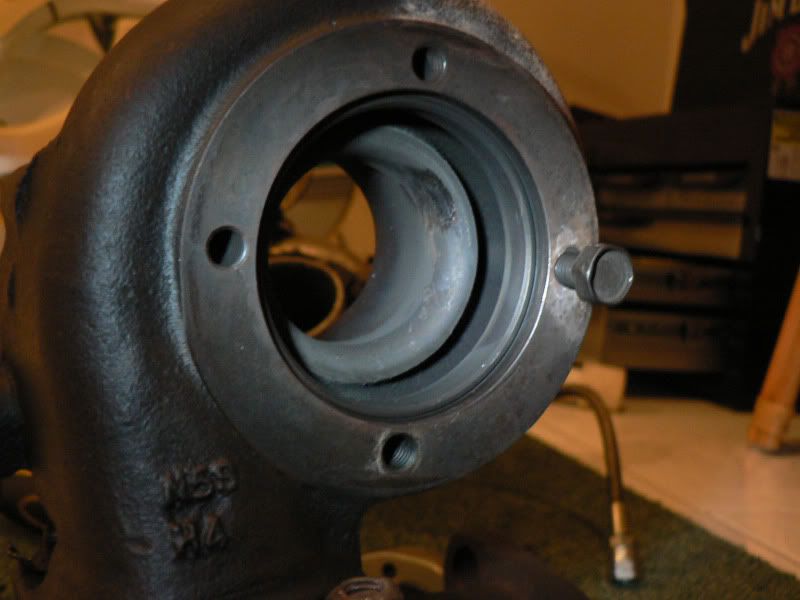
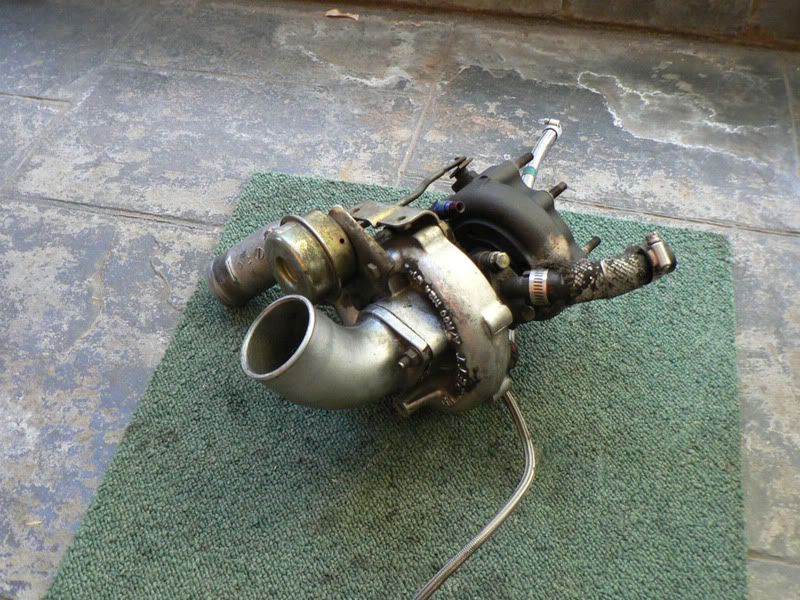
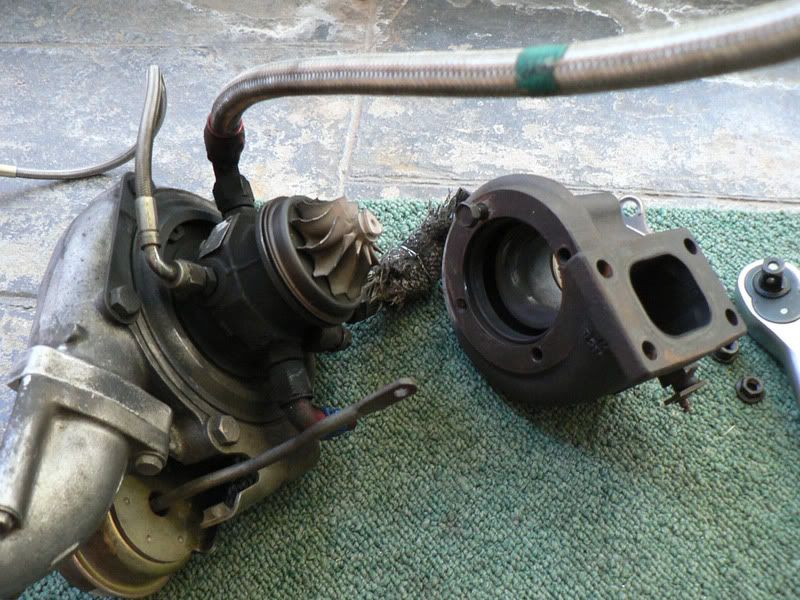
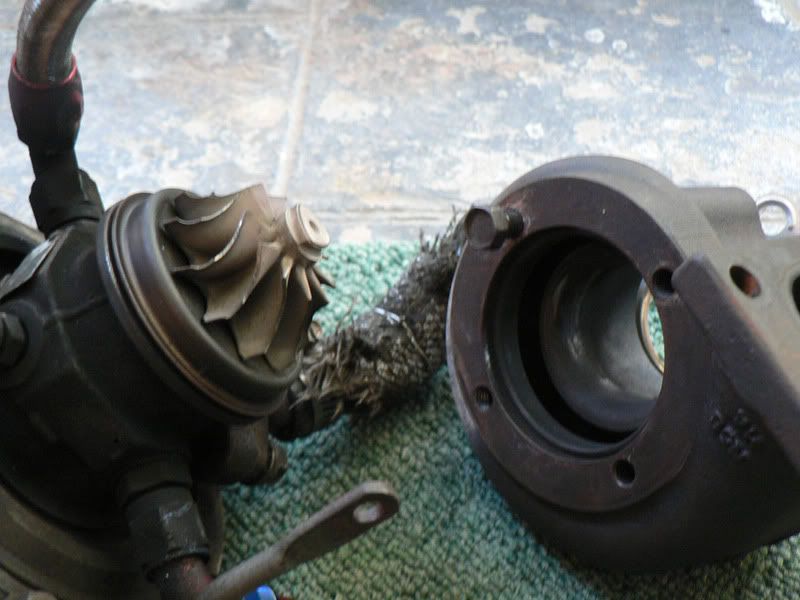
The end result is a completely shagged T28 turbo... the exhaust wheel had grinded and shimmed the internal housings of the turbo to a good 2 - 3mm, causing the exhaust wheel to seize and turbo to completely die a slow, yet painful death...

As for now the car sits on stands until funds clear for a new turbo... T28-RS this time round, bit more power... and in all honestly, I dont want to do this job again so i'm doing it properly!

I'll update once the new turbo has arrived & is installed with the new Tomei dump-pipe. Until then enjoy the photos i've added..

Cheers!


Anthony

Friday, December 26, 2008

The parts list!

Well i've decided its about time I posted up an official list of parts/modifications done to the vechile. This makes it easier to look back upon the first post and reference the transformation that the vechile has had since.

Now the list may be sketchy and I may have left out a few things.. but most of it is all there and as we all know more stuff will be continually added as time goes.

Vehicle: Nissan 180sx


Engine & Drivetrain

- SR20DET Rebuild (Black Top)
- Garrett T28-RS turbo
- Braided Turbo Lines
- Blitz 450cc Injectors
- Bosch 040 fuel pump
- Bosch Z32 AFM
- Blitz Sus-power Pod Filter
- Hybrid Intercooler
- Pivot Volt Stabilizer
- Gizzmo EBC
- Greddy Emanage ECU
- Greddy Rocker Arm Stoppers
- Greddy water temp adaptor
- Greddy 900cc Sump

- Koyo 52mm Radiator
- Apexi N1 Exhaust system / Straight Pipe
- Tomei Dump Pipe w/ new o2 Sensor

- Nismo Transmission Mount

- Exedy 5 Puk cushion-button Clutch
- Nismo Release Fork Pivot
- Custom Re-enforced Short Shifter

Suspension & Handling

- Hotbits Coilovers w/ Camber pins
- HPI Engine Dampener
- Cusco power-brace
- Cusco Tension Rods
- Kazama Castor Rods
- Polyurethane Pineapples
- Polyurethane Steering Spacer
- Re-enforced Control Arms

- Re-enforced Castor Channels
- D-project Re-enforced Steering Rack bushes

- R33 GTS-T Brake setup
- RDA Slotted Rotors (Front & Rear)
- Uras Brake Pads
- CBC Wheel bearings

- Work Emotion CR KAI (track wheels)
- 18 x 9.5 +20 / 17 x 9.0 +17

- Lexani / Toyo Proxes 4
- Work RS Wheel Nuts

Interior

- Pioneer Head Unit

- Schneider Speakers w/ splits
- Kenwood Amplifier
- Boston 10” Sub

- Bride ERGO 1.5 Drivers Seat
- Type X passenger Seat

- Drft weighted Gear knob
- Cusco Drift Button
- Pivot Gekko Boost Gauge
- Pivot Gekko Water Temp Gauge
- Pivot Gekko Oil Temp Gauge
- Custom Half Roll Cage w/ Padding
- Sabelt 4-point harness (Driver & Passenger)
- Cusco Harness Brace
- Cusco Rear Strut Brace

Exterior


- D-max Type II bodykit
- D-max rear bootlid spoiler

- Rear Guards rolled & flared
- Removed + Shaved rear windscreen wiper & power antenna

- Relocated new euro antenna to roof wiper-jet
- Resprayed Colour: GTR Bayside Blue w/gold pearl & Black roof w/gold pearl
- URAS Clear Parkers
- URAS Clear front indicators

- HID Angel eye Headlights
- Straight Exhaust w/ extruded pipes
- 18% Window Tint

At this stage i've still got a few things to purchase in regards to the suspension.. so i'll be sure to add it to the list once that happens!

Enjoy.

Monday, December 22, 2008

Two Steps forwards... Ten steps backwards

Well! so much has happened since, its been rather eventful I must say...

From being defected to having the car fully resprayed and kitted! Yes... its a new starting block some might say. But first off i'll begin with the story of the defect, mind you it was bad timing..

Having organized to drop the car off to benny & graham at tyreplus in phakenham I left work a tad early to make it on time... so I went through the monash to get there... to my luck there just so happened to be a booze bus with two TMU officers on board, just upon the beaconsfield/officor exit on the monash. All went peachy up until the point where an old TMU officer (who i probably shouldn't specify a name) decided to question the specifications of the vechile. What made matters more disappointing was the fact that the workshop was only 5 minutes down the road from the booze bus!

.... So I walked away with a $250 fine for argueing with a police officer (High powered vechile) and a defect notice with a MAJOR roadworthy required, awesome huh? Along with the added note that he would not allow me to drive the vechile from its current position; required a fully licensed driver or to be towed.

Well thanks to a mate of mine the car got driven to tyreplus safely straight away. From that point onwards benny & graham were a great help (you know I love you guys!) of sorting out most of the issues; along with the replacement of wheel bearings and having removed the aftermarket suspension components and replacing with standard, for the defect to be cleared.
A couple of weeks down the track, the car was ready to be brought in for a fresh respray & kit fitted. So the guys at DT panels did some magic and completed the vechile within a staggering time of a week! Leaving a couple of weeks to clear the defect before the registration got suspended.

Since then i've gone over every nook & cranny... replacing every bolt, bush and putting EVERYTHING back to standard; so it's well and truely passable through vicroads...

Only until last week all was cleared.. the outcome was quite impressive, having attained the roadworthy certificate and clearing the defect notice in the one day!

To sum it up; it was bound to occur, the defect was way overdue and at the same time it was a wake up call for a few things. Yes driving an import that stands out like no other is unpractical as a daily, No i'm not giving up on drift.

After the last post a few changes took place and heres what has been done:
- New rear wheel bearings installed
- Coilovers Fully rebuilt with no bushes/oil/bump stops and tensioned springs
- Car resprayed in [tv2] bayside blue paint with black roof & gold pearl all over
- Car kitted with D-max type 2 & bootlid spoiler
- Uras Tierod spacers installed
- Battery tray covered and whole hidden neatly
- Rollcage padded
- New Toyo Proxes 4 tyres for the front Meisters
- In the process of claiming Whiteline Swaybars F & R
- New angel eye HID headlights
- New stubby roof antenna installed
- Rear windscreen wiper & powerantenna removed & shaved

All modifications removed for defect and returned to standard. Till this point i'm awaiting for funds to cover the cost on a few new suspension components then the work will begin, rebuilding the suspension from scratch!

Here are some pictures for the viewing pleasure!


I apologize for the blunt post.. but i'll be sure to update soon this time round. Till then,

Takecare.. Merry Christmas & A happy new year!


Note - a special thanks goes to Vu & the boys at DT Panels, Benny & Graham @ tyreplus, Trent & Cat from status tuning and all those that assisted in helping me till this point including Dazza and Star.

Saturday, October 25, 2008

News...

Hey guys,

Well sadly the car experienced some damage on the 3rd of october! By accident, owner of the shop next to the tuning shop decided to reverse into the front of the car with his Prado Landcruiser whilst my car was parked at around 9pm.


Thankfully the damage was subtle and not too harsh; though what did get damaged:
- Front bar
- Front Left Fender
- Front Left Headlight motor/frame
- Front Left Uras parker
- Radiator support has been pushed back roughly 10 - 15mm
- Chasis rail cop'd a whack from the tow bar

Overall the total cost to fix is around $2300..

Since this incident occured I've taken advantage of the situation and decided it'd be a great time to get the car kitted up and resprayed whilst it goes in for repair. So without hesitation I placed an order down for:

- Dmax type 1 bodykit


- Dmax Bootlid Spoiler


So after 3 odd weeks of pestering and dealing with the insurance drama, the guy finally managed to make a claim with his insurance company so the car can receive some TLC at DT-Panels in the next week or two!

The car will be resprayed in the same blue but;
- Black roof with blue pearl (possibly some blue flakes)
- Possibly gold pearl in the blue paint, have to do some testing

Meanwhile aside from the cosmetics I've managed to finally get my hands on some new wheel bearings! Big thanks to CBC! After being quoted $250 per each wheel bearing from nissan, CBC gave me an absolute killer price of $290 for the pair.

Further spending continued last night, after making a quick call to mr Tony B from autobarn cranny enquiring about the parts he had left for sale from the track car... I managed to pickup all in one night from trent & cat @ status tuning & tony b the following:
- Uras tie-rod spacers
- Usual service gear (Motul oil, Drft oilfilter, spark plugs)
- Greddy Sump
- Hybrid GT-spec Intercooler w/ alloy piping
- Speaker covers, FINALLY!


At this stage i'm hoping to knock out the handling issues before the car goes to DT's, so my plan is to get the following done next weekend with the added help from the boys at tyreplus:
- Camber Pins install
- Tie rod spacers install
- New Wheel bearings + Hubs install
- Federal Tyres fitted to the rear miesters
- Wheel Allignment + Castor adjustment

Fingers crossed that funds allow it to happen! Otherwise it'd have to wait till the car gets back from DT's... Though i'd be afraid of grease marks coming in contact with the fresh paint =\

Oh well, thats the latest!

I'll be sure to post up more news along the way, until then takecare!

Wednesday, October 1, 2008

I'm ALIVE!!

YES!

I know I can get slack sometimes, but who would've thought it'd take 7 odd months to update the progress of the car! seriously!

Well where do I start? Alot has happened since so i'll do my best to cover all the ups & downs...

Continuing from the last post with the installation of the gauges, steering spacer, re-enforced control arms & wheel spacers my next highly anticipated mod was the new clutch!

The clutch would've had to been the main replacement required to get the car sideways in 2nd + gears so I decided to get all of the transmission gear sorted in the one hit along with replacement turbo lines, new fuel pump & fixed fuel pump mounts. Within that annual mod bite I purchased the following:
- Exedy 5 puk Cushion Button clutch
- Nismo Transmission Mount
- Nismo Release Fork Pivot
- Nissan Rubber Shroud (was missing; hence my random oil droplets)

- Greddy Rocker Arm Stoppers
- Bosch 040 Fuel Pump
- Braided Turbo Lines


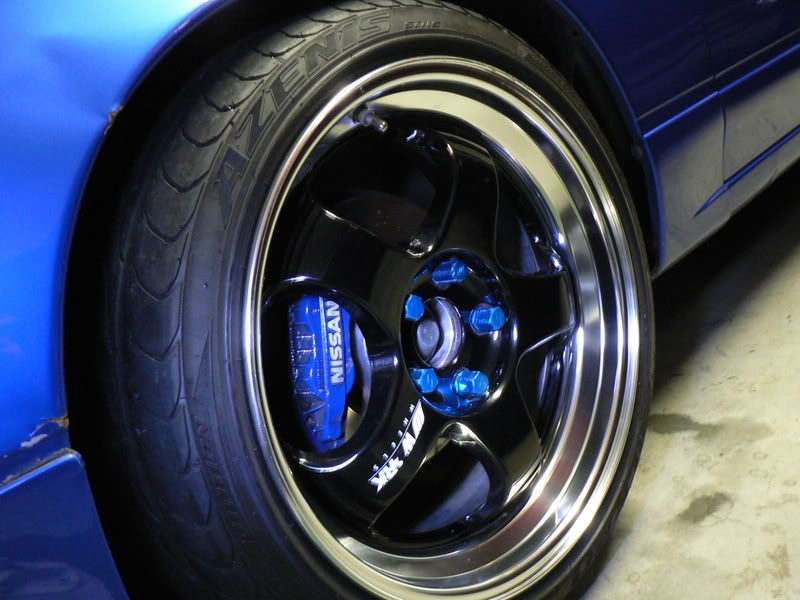
During the period of receiving the parts I had ordered, I was in the process of moving into my new apartment with two other room-mates, though things didn't turn out all that flash... Parts were sitting in my room (covered of course) and within the first 10 days of living there a group of scum ass's decide to steal the wheels off my car & leaving the car on bricks.

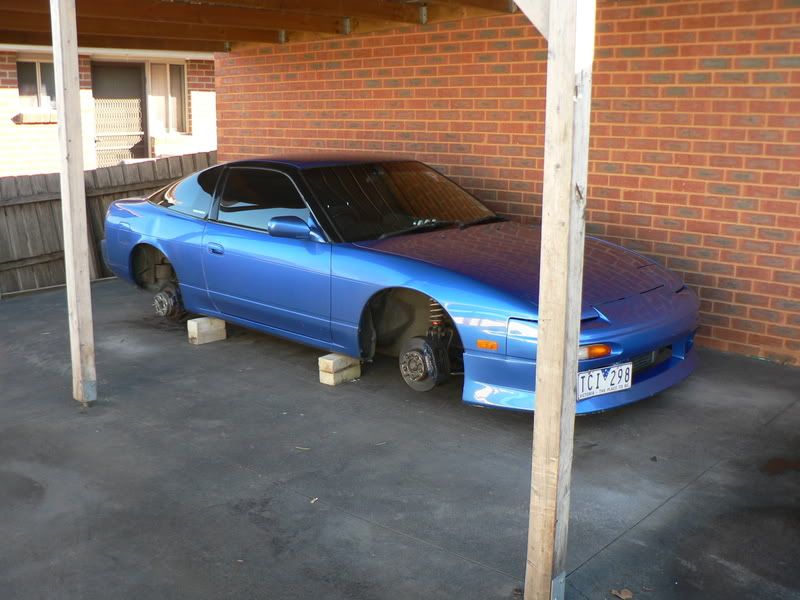
Yes, it was a huge kick in the nuts to wake up one morning to find it like that... But somehow luck spun my way & I managed to track the theives down along with my wheels!

Note - I still managed to get all of the parts installed & car prep'd for winton before the recovery of the wheels, which was only one week.

Between now & then much has been spent on the vechile, rather than babbling on about the specifics i'll simply list the mods that have been done; to paint the picture abit clearer.
- Cusco Power-Brace
- Cusco Drift Button
- Cusco Harness Brace
- Monza Race Harness
- Work RS Wheel Nuts
- Work Emotion CR KAI (pair) 18x9.5 +22
- KOYO 52mm Radiator
- Custom 5-point Rollcage
- Custom 3" straight Exhaust w/ Extruded Twin Tips
- Custom Solid Gear Shifter
- Bride Ergo 1.5 passenger seat (which is currently drivers)
- URAS Clear Parkers w/ strobes
- Yashio Factory Cam Pulleys
- Greddy Emanage + Tune

One of the significant changes to the car at this stage is the shimmed diff. The week before septembers winton practice day Dazza & I prop'd the car up and pulled the diff out in order to spend an entire 3 - 4 hours attempting to put the diff back together with the extra shimmed ring, by increasing the standard shim of 2.3mm to 4.2mm. We managed to do it! one month later & the diff still feels like a locker (skipping every corner).

Not only was the diff shimmed but I had Trent tune the car with the Greddy Emanage a couple of nights before winton. He managed to scavange a staggering 156.7rwkw at 10psi in comparison to 143.9rwkw at 10psi. It now has more top end torque & a little more power which was fantastic for winton. The boost couldn't be raised anymore than 10psi due to the bleed-valve being the boost controller, i'll be changing over to a Blitz id3 electronic boost controller after the alarm & bearings are done.

Lately things have been going slow, loss of job has forced me to return to the job I initially resigned from (BMW). Money is slowly building but as for further modification I would have to say is on hold at this point in time, until I have enough funds (in a months time) to purchase another vechile as a daily driver.. using the 180sx on a daily basis is far too unpractical, especially with the rollcage and straight exhaust on.

In the next week or two I should have the new alarm installed.. Yes i've finally taken the plunge and decided to purchase a VIPER alarm w/remote start & GPS tracking. I've learnt my lesson, so i'm no longer taking any chances. Once the alarm is sorted i'll be getting the rear brakes, bearings & studs sorted along with the purchase of a new dump & front pipe.
Until then, Takecare & I hope this update has kept you entertained!


Note - An enormous shoutout goes to daz, trent, vu & all of those that have assisted in help up to this point.

Monday, March 10, 2008

Progress continues..

It's been just over two months since my last write up, so you may be thinking alot has happened since.. But i've barely had enough time to scratch myself these days, with full time work and part time study it's beyond a joke trying to fit in time to work on the car. Thankfully, the public holidays and weekends treated me well with time, so i'll kickstart the progression with the wiring of the pivot gauge, yes they're all wired up, took an entire 20min, along with the proper grounding for the volt stabilizer.With that completed, my next mod was the installation of the steering spacer; after having it sitting on my desk for the past 3 - 4 odd months, I figured it was time to finally put it to good use. I had my first attempt of replacing the spacer at home, yet i failed to un-do two 12mm nuts that were closest to the firewall, 15yr old nuts that gave me less than an inch of arm movement. With special thanks to the boys at DT panels, we begun taking the old steering spacer out at 5pm, once we got it out it was roughly 7 - 8pm, then we came across our problem... a problem that we didn't suspect, we had to remove the entire steering rack in order to slip the new one back on, overall we finished and closed the shop up at roughly 1am in the morning.
So... was it worth it? Well, everything counts in the end right? but honestly, all I noticed was a slightest bit more response to the steering.. nothing you would usually pick up on; so if you're in the running for a steering spacer.. I say get it if your current one is seriously shagged, otherwise save yourself the time and hassel and dont buy it.

Moving a few weeks ahead, I was influenced by dazza's idea of re-enforcing the control arms and castor channels. Took this opportunity of doing the same thing, since my left control arm and castor channel were already bent, I got the boys from DT to weld up my control arms and castor channels and only had the time to install them yesterday; with the old ones replaced with the new re-enforced, definately going to attain a proper wheel allignment, castor adjustment and stiffer subframe.


Having completed the installation of the re-enforced control arms and castor channels yesterday, my next mod was a Cusco Tension bar, still waiting for some spare time to come along so I can pick it up.. until then i'll leave it as is.

Tonight, once the cool change came through I loaded the car with tools and quickly bolted to my dads place to fit on the 27mm spacers onto the rear. In the process, I fixed up one of the left studs that was abit mangled, and spent about 3hrs adjusting the height so the tyres wont rub the gaurd. With the spacers on, height adjusted (still rubbing the gaurd on bumps) all is needed is a good flaring, so i'll be sure to get that done in the next week or two.

Definately does look 10x's better and tougher with the rears spaced out.


Ever since I purchased the vechile, the main mod that has needed to be done was the clutch.. till this day I still haven't replaced the clutch with a stock or a 5 puk, this is mainly due to other mods taking over, but in the next two weeks I shall see my new clutch arrive at the door; yes finally a new clutch! Not just any clutch though, I've been influenced by dazza once again & am going for a Blitz active single plate clutch with a Light flywheel.

Hopefully all goes well, definately looking forward to the installation of the new clutch along with a few more goodies, so within the next 2 - 3 weeks I shall blog again with more updates! Until then, takecare and enjoy the pics.

Tuesday, January 1, 2008

Whats new?

Well, its been awhile since my last post; roughly two odd months I would imagine. Nothing much has happened since then considering the work-load i've endured in between. Nonetheless, that doesn't mean to say i've stopped my never ending hobby!

So, what has been done during those two months? Well, juding by my last post I had finished the 4-pot brake installation and was ready to order my new shoes from europe. Unfortunately, the order from europe for the 18x8.5 & 18x9.5 +12 wheels, got rejected... yes, rejected! why? Since they CAN NOT ship to australia, of all the countries.. australia wasn't on their list.

I must admit, it did bum me out quite abit; though I managed to square a deal with a mate and managed to snap up the work meister s1's instead. Once that was out of the way, I was ready to place my order for some poly-urethane pineapples & solid steering spacers.

In the process, I decided to take the plunge and purchase the following:
- Pivot Boost gauge
- Pivot Water Temp gauge
- Pivot Oil Temp gauge
- Pivot Volt stabilizer

Overall, a fair bit of money was spent.

Couple weeks after the pineapples & steering spacers arrived I managed to find some spare time to pop into my mates and have a good old time trying to slip the pineapples on the rear subframe. Note, it was an absolute nightmare attempting to slip the full rings onto the subframe in the middle of the street with very little tool assistance. Nonetheless, after a good 2 - 3 hrs we managed to have them fitted and took it for a test slide. Definately succeeded in its purpose to eliminate axel tramp, which was refreshing.

Till then, not much has happened apart from the odd height adjustment. I've now lowered the rear so it sits flush with the rear quarter lip, as the front just sits on the front guard. Roughly 5cm is my lowest point off the ground now, compared to the previous 10cm. 30mm Spacers are needed for the rear to be pumped out abit more, and a possible guard lipping.


Only recently, significant changes have been made on the car. Roughly a week or two ago, pop'd into my mate dazza's place to do a full service since its been well overdue; afterwards we decided to remove the straight pipe exhaust system that was bolted on months back, and replaced it with an Apexi N1 3.5" exhaust system with a de-cat pipe. This definately got my stomach tickling, but till this day.. I miss the agressive roar that the straight pipes made. After bolting on the Apexi n1, we managed to pop some flames on first start up with the de-cat pipe in (vid will be up soon!).


The following day, I found myself bored as you would imagine when you're on holidays.. So I decided to mount the pivot gauges and install the volt stabilizer. For those reading, who may be interested in purchasing a volt stabilizer... I say, its not worth it.. really doesn't make much of a difference with the unit alone; make sure you replace all the earthing cables before installing the unit, that way you'd be sure to expect an improvement.


You may be thinking, what now? Well, after this point i've got 3 weeks of uni left before my long holiday.. After those three weeks, back to work and back to modding. First on the list at the moment is a new clutch, heading towards a 5-puk cushion button at this stage and then snapping up a greddy e-manage for a proper power tune, would be dropping it into Trent from uras for a dyno and tune to extract every last kw. At the moment, i'm running less than stock boost, which is absolute no fun for me anymore.. so soon we shall see some significant improvements, until then takecare!

Enjoy the updated pics!